This time it will discuss tips for editing the pictures taken with android camera in order to get the HDR effect. What is HDR? Technically HDR (High Dynamic Range) is a state or process of making photo contains a large range of Dynamic Range or HDR can be easily understood with different images called "light" and "dark" is very large, so-called dynamic exposure range. The goal of HDR is sendir bring unique patterns in the image, such as a cloud pattern or texture images lined up more pins. To perform process HDR photographers typically use 3 ways:
Multi-Exposure: Make some of the same photos but different exposure. (Bracketing).
Merge: Combine the photos with HDR Merge.
Tone-Map: Perform Tone Map to the combination to set the tone light dark.
It was done with the editing tools like Photoshop on your PC.
Then came the question. How can we get the image file yag we can later make HDR? The answer is that there is a state of nature or portraits or anything in the world that contains dark and light discrepancy is very large (large dynamic range) you can create HDR photos on the situation. Not necessarily during the day, evenings are also a lot of circumstances that contains HDR.
Enough discussion, we return to the topic. Is using our android smartphone can create HDR photo files? Sure can, now at Play Store an awful lot of supporting applications to create HDR file. To post processing or image processing images that already exist in the sdcard we can use Camera Zoom FX, Pro HDR Camera, HDR Camera and PicSay. As for the In Camera Processing or processing carried out after the object image was taken from the camera can use Camera360 Ultimate. In this article we use PicSay editing and Camera360 Ultimate.
Here are the steps - steps using PicSay HDR editing.
1. Of course its open PicSay, if not yet installed it can be downloaded at PlayStore.
2. Then select the image to be used as HDR.
3. Once the image is selected then choose Effect menu located at the bottom of the image.
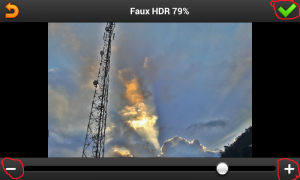
4. After selecting the effect it would appear many options we choose Effect Faux HDR effect.
5. Then live we set uses a slider under the image to taste transform and get a desired image, select the image after the green tick in the top right corner.
6. Having considered the above we set the slider can also be set so that dark-light contrast more clearly visible in the image by selecting the Adjust menu way too similar to step 6.
7. Having considered the above we set the slider can also be set so that dark-light contrast more clearly visible in the image by selecting the Adjust menu way too similar to step 6.
Next Step - Step take HDR images with Camera360 Ultimate.
1. Open Camera360 Ultimate, if not already installed can be downloaded at PlayStore.
2. Then select the picture wizard wand to select the effect.
3. Then Select the HDR.
4. Then start taking pictures, if the picture has been taken then akn appeared some HDR effect option that has been provided, choose as you wish and then select save and done!


0 comments:
Post a Comment